In this post I'm going to mount a PostgreSQL database to Governance Registry 4.6.0. I will be going through each and every step excluding installation of the pgAdmin3. The WSO2 Governance Registry helps you move to the next level and fully understand the state and scope of your SOA portfolio by communicating and managing the lifecycle of your services, and by identifying and highlighting the dependencies between services and consumers.
Let's start the mounting process:
Firsts you need to create a separate DB in postgreSQL, For this I'm using pgAdmin you can use command line as well.
Step 1: Connect to the server

Step 2: Enter the database server password(default password will be root)

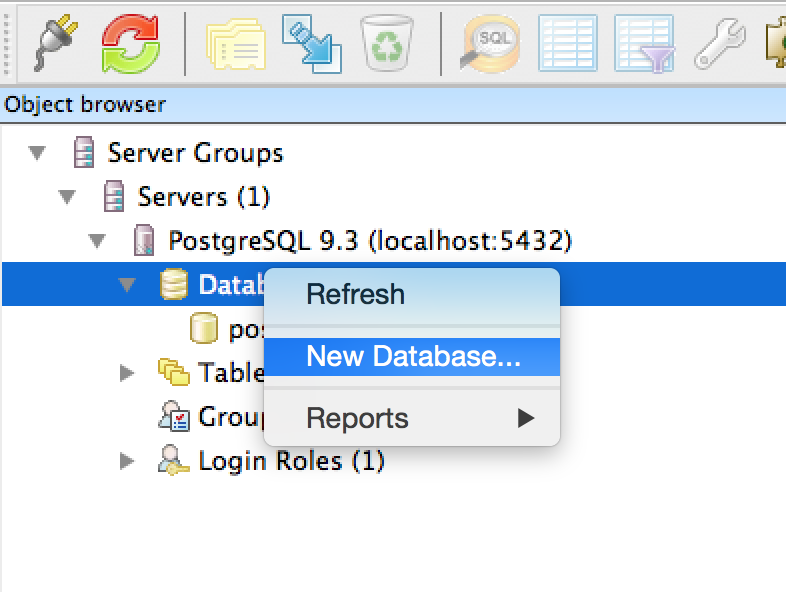
Step 3: Create a new DB by right clicking on database drop down.
Step 4: Enter the new DB name as gregdb

Step 5: Double check the file structure is fine.

Step 6: Download and Copy the PostgreSQL JDBC connector to <PRODUCT_HOME>/repository/components/lib
Step 7: Include below configuration values in <PRODUCT_HOME>/repository/conf/datasources/master-datasources.xml
Note: please change the username and password tag values accordingly.
<datasource>
<name>WSO2_MOUNT_DB</name>
<description>The datasource used for registry and user manager</description>
<jndiConfig>
<name>jdbc/WSO2MountDB</name>
</jndiConfig>
<definition type="RDBMS">
<configuration>
<url>jdbc:postgresql://localhost:5432/gregdb</url>
<username>postgres</username>
<password>root</password>
<driverClassName>org.postgresql.Driver</driverClassName>
<maxActive>50</maxActive>
<maxWait>60000</maxWait>
<testOnBorrow>true</testOnBorrow>
<validationQuery>SELECT 1</validationQuery>
<validationInterval>30000</validationInterval>
</configuration>
</definition>
</datasource>
Step 8: Include below configuration values in <PRODUCT_HOME>/repository/conf/ registry.xml
<dbConfig name="WSO2_MOUNT_DB">
<dataSource>jdbc/WSO2MountDB</dataSource>
</dbConfig>
<remoteInstance url="https://10.100.5.173:9443/registry">
<id>instanceid</id>
<dbConfig>WSO2_MOUNT_DB</dbConfig>
<readOnly>false</readOnly>
<enableCache>true</enableCache>
<registryRoot>/</registryRoot>
<cacheId>root@jdbc:postgresql://localhost:5432/gregdb</cacheId>
</remoteInstance>
<mount path="/_system/config" overwrite="true">
<instanceId>instanceid</instanceId>
<targetPath>/_system/config</targetPath>
</mount>
<mount path="/_system/governance" overwrite="true">
<instanceId>instanceid</instanceId>
<targetPath>/_system/governance</targetPath>
</mount>
Step 9: Start the greg server. While starting the server make sure that server log prints below lines somewhere begging of server startup.
[2014-12-09 11:03:24,739] INFO {org.wso2.carbon.registry.core.jdbc.EmbeddedRegistryService} - Configured Registry in 113ms
[2014-12-09 11:03:24,760] INFO {org.wso2.carbon.registry.core.jdbc.EmbeddedRegistryService} - Connected to mount at WSO2_MOUNT_DB in 1ms
[2014-12-09 11:03:25,386] INFO {org.wso2.carbon.registry.core.jdbc.EmbeddedRegistryService} - Connected to mount at WSO2_MOUNT_DB in 0ms
[2014-12-09 11:03:25,543] INFO {org.wso2.carbon.registry.core.internal.RegistryCoreServiceComponent} - Registry Mode : READ-WRITE
Step 10: To double check whether you have attached the PostgreSQL to greg instance successfully, after you login to the navigate and click on the Home > Resources > Browse. then you can see 2 arrows above governance and config folders.
Step 10: To double check whether you have attached the PostgreSQL to greg instance successfully, after you login to the navigate and click on the Home > Resources > Browse. then you can see 2 arrows above governance and config folders.
Comments
Post a Comment